Hello! Well, after a 6 month break from posting I am admitting defeat on keeping up with regular blog posting. In the last year I have made several dresses, done some client graphic design work and have been squirreling away at my new stationery business, yet finding the additional time to document, edit and write up these projects for the blog has proved a step too far.
I have decided therefore to take the pressure and nagging guilt that I'm not blogging, off my shoulders and will be ramping up on my instagram posting instead. This is going to be much quicker and allow me to connect with you much better I hope!
With my eldest now in school and my little fella growing up quickly I hope to be launching my new business before too long...
So thanks for reading, and goodbye for now! I hope to see you over on Instagram, come find me @makeplaydo
Emily x

Wednesday, 13 September 2017

Tuesday, 21 March 2017
'Write On' Campaign 2017

Whilst researching some paper stocks recently for a project I'm currently working on, I came across the 'Write On' campaign. This is a challenge to write and send 30 letters in 30 days through the month of April (National Letter Writing Month in the US it turns out) Being a stationery and paper obsessive, and loving the simple pleasure of putting pen to paper, I got excited and decided to join in. Its been organised by Egg Press and Hello Lucky, check them out!
Although originating in the US, I applied for my letter writing pack and eagerly awaited its arrival by airmail over the Atlantic! A couple of weeks later a set of beautiful letterpressed cards arrived, complete with stickers and a list to document my letter sending. I look forward to making the time to put some thoughts on paper and to connect with some special people, and those that I don't get to correspond with as often as I would like. Receiving a letter is so much more personal than receiving a text or an email. The tactility of the paper, the handwriting of your friend, and the fact the letter has travelled its own little journey between you both makes it more special somehow. I also love to look back at old letters, they are a wonderful time capsule keepsake. Plus who doesn't love to find something handwritten among the pile of bills on the doormat? I am often guilty of failing to stop and think before I speak, and so I actually feel I can articulate myself far clearer and with more consideration when I write.
You can find out more about the campaign here and get hold of your own pack of cards, or just pick up a pen and a scrap of paper and get going! I have always been a card and paper collector so I have raided the box and set aside some lovely ones to use in addition to the Write On pack. Now to set about determining my list of recipients... I shall be documenting my letters over on Instagram @makeplaydo, so come follow me there! #Write_On
Happy writing...
Thursday, 16 March 2017
'Moominland' at Southbank

I had the enormous pleasure of visiting 'Adventures in Moominland' at the Southbank Centre yesterday, it was superb! This is like no other exhibition I have been to, it was a completely immersive experience and just amazing to visit, so much fun! I was, quite rightly, unable to take any pictures, and actually nor do I want to describe too much detail and ruin the surprises! What I can tell you is that the picture above may look like a book on a shelf, but is in fact the entrance to the exhibition. The giant book opened up and we were led into a magical world by our engaging and energetic guide who took us on the journey, offering insights into Tove Jansson's life and practices and supporting a greater understanding of her inspirational work.
Huge attention to detail has been paid to the set design, to ensure the entire experience is authentic to the imagination and creativity of Tove Jansson and the wonderful worlds she created. There are lots of original artefacts and artworks, on loan from the Moomin Museum in Finland and they are lovingly displayed and also hidden. Go and see what I mean for yourself! I really loved seeing her paints and tools, and original drawings alongside other personal items in these fantastic rooms. Such an excellent installation, it must have been an absolute joy to be involved in researching and making.
In addition to the overall participatory fun and visual delights, our tour guide was engaging, friendly and informal and I learned so much about Tove's life and personality, and how this informed her creations. I admit I'm not usually a fan of guided tours per se but this is very different, and really supports the surrounding and the work, rather than distracting from it. We were encouraged to explore the rooms ourselves while she was talking, and there were many surprises along the way!
Before my visit I was already a dedicated moomin fan, and adore reading the stories to my toddler in bed at night. I am obviously drawn to the beautiful graphic illustrations, superb bold colour palettes and clean lines; but the integrity of the stories, morals and the characters is equally as appealing to me.
The show is recommended for ages 7+, however I took my bold nearly 4 year old and she absolutely loved it. Use your own discretion, if your child is likely to be phased by the dark or a loud noise, it might not be for them. The guide can take you out if you need to leave, but you won't be able to go back in, so consider this carefully! They have recently extended the run until August, and you must buy a ticket in advance. I thoroughly recommend this exhibition. I didn't think I could be more in love with the moomins and Tove's illustrations, and then I went to this and was even more amazed! There is also a cute pop up Moomin shop in the foyer, and of course we had to visit the glass lift in the corner. If you don't know what I'm talking about, just go and see it for yourself, its cool.
The Southbank is such an excellent area, my favourite part of London and its really family friendly. There is so much to see, and its so creative and alive with art and dance and performance everywhere you turn. I love that just by standing on the spot at Southbank you can look out across the Thames, see boats, trains, buses, amazing old and new architecture, Big Ben, loads of landmarks, the London Eye, bridges, birds, skateboarders and more! Its a real hub of activity, and there is so much to absorb for free.
This post was feeling a bit text heavy and lacking in some nice visuals so seeing as I couldn't show any pictures from the exhibition, here's our favourite well-loved books below. Thanks for reading, and I hope you can get there yourself soon.
'Adventures in Moominland'
at the Southbank Centre London
Until 20th August 2017
Tickets £12 - £16.50


Saturday, 7 January 2017
Logo design - Helen's Glass
A little logo design I put together recently, in record time I might add! I battle with finding the time to work on my own projects constantly, yet give me a tight deadline and a desperate friend and I can somehow pull it out of the bag and surprise myself.
The brief was to create a logo for a handmade glassware 'maker' friend of mine. She is just starting out at craft fairs and selling online and initially needed a logo to use on business cards and stickers for sealing the wrapped products, as well as using online to brand her work.
She wanted it to be friendly and simple, not too flashy. A lot of her glass work starts with sharp cut shapes and tiles of glass, so I thought geometric shapes would work well. The thick black line is subtly suggestive of stained glass, and I chose a handwritten font to signify the handmade element and soften it/make it 'friendly'. As much of Helen's work is bold and brightly coloured, I produced the logo as a multicolour version, which she loved and chose to use for her business cards.
Working on this reminds me how much I love designing logos, its one of the most satisfying areas of design for me. I don't get much time to seek work like this any more, but it is nice when it finds me every now and then!
You can check out some of Helen's work here at Helen's Glass


The brief was to create a logo for a handmade glassware 'maker' friend of mine. She is just starting out at craft fairs and selling online and initially needed a logo to use on business cards and stickers for sealing the wrapped products, as well as using online to brand her work.
She wanted it to be friendly and simple, not too flashy. A lot of her glass work starts with sharp cut shapes and tiles of glass, so I thought geometric shapes would work well. The thick black line is subtly suggestive of stained glass, and I chose a handwritten font to signify the handmade element and soften it/make it 'friendly'. As much of Helen's work is bold and brightly coloured, I produced the logo as a multicolour version, which she loved and chose to use for her business cards.
Working on this reminds me how much I love designing logos, its one of the most satisfying areas of design for me. I don't get much time to seek work like this any more, but it is nice when it finds me every now and then!
You can check out some of Helen's work here at Helen's Glass


Thursday, 17 November 2016
Wedding table plan - Hannah & Phil
 Well, this post is better late than never! Some 6 months ago I was asked by an old artschool friend to help create their wedding table plan. I was also lucky enough to be invited to the wedding, which was a wonderfully styled 40s teadance themed event. Lover of all things vintage, the bride designed and handmade her own invitations in the guise of wartime ration books. There was even a prize for the most creative and 'on-theme' rsvp! Guests were encouraged to dress in 40s attire, it was such a fun day.
In addition to loving this era, the bride is also obsessed with Cornwall, where the couple got engaged. They wanted this to be a part of the theme too so I was asked if I could produce a table plan based upon the locations of old Cornish mines, which would provide the table names. I also produced table name cards with information on each mine on one side, and a (very tricky) Cornish quiz on the reverse. (Did I mention the bride was a teacher?!)
I tried to design the map in a clean and simple way, and with a little nod to wartime maps to tie in with the theme. I deliberately kept a mute colour palette as they had already created so many lovely and colourful details to the day, and I didnt want the map to be too imposing. Working with Hannah was great, she was really organised and clear about what she wanted, and I doubt I'll ever have another creative brief quite like it!


Tuesday, 13 September 2016
Fabric HQ, a great find!
Hello! Long time no post, I know. I'm so busy juggling the little ones and the housework and the many projects I'm always chipping away at that managing to actually complete anything and document/put together a blog post about it takes me forever! I have forced myself however to sneak in this little post about an excellent fabric and haberdashery shop I found on Saturday.
 Based in Stoke Mandeville in Bucks is Fabric HQ, which holds an awesome fabric collection, patterns and sewing bits and bobs. The room is a lovely clean white space, filled with colourful patterns and solids, arranged and collated really beautifully by colour and theme. I got chatting to one of the owners Jaqcui who was really knowledgable and friendly, and helped me make my choices. At the far end of the room there was a dressmaking class in progress, which added to the great atmosphere of lots of like minded 'makers' busily browsing. I look forward to going along to some classes in the future if I can manage it! They sell online too so you should really check out their lovely prints.
Dotted about the place are handmade garments and goods which I found pretty inspiring, and I was overall just so impressed at the 'tasteful' collections. I have been to many a fabric shop and had to wade through loads that wasnt to my taste, but this place was full of quality fabrics including some gorgeous retro styles that clearly appealed to me! They also had loads of Merchant & Mills stuff, and I am such a sucker for their beautiful packaging and branding.
The shop itself operates among a cute little collection of single storey small business units, at Layby Farm in Stoke Mandeville. I didnt have time to check out the other places but noticed they include an art gallery and biscuit shop, and the units are a stones throw from a goat petting zoo which is brilliantly random!


 I got a few metres of 'Wispy Daybreak Nimbus' Morning Walk
by Leah Duncan for Art Gallery, as I'm doing a dressmaking course later
this month and wanted to choose something nice for that. I'm drawn to
botanical illustrations at the best of times, and this print had me with
its lovely colour palette. I'll let you know when the finished garment
is made...
I got a few metres of 'Wispy Daybreak Nimbus' Morning Walk
by Leah Duncan for Art Gallery, as I'm doing a dressmaking course later
this month and wanted to choose something nice for that. I'm drawn to
botanical illustrations at the best of times, and this print had me with
its lovely colour palette. I'll let you know when the finished garment
is made...

Check them out online here, or in person Mon - Sat, 10 -2
Fabric HQ, Unit 8, Layby Farm, Old Risborough Road,
Stoke Mandeville, Buckinghamshire, HP22 5XJ

Dotted about the place are handmade garments and goods which I found pretty inspiring, and I was overall just so impressed at the 'tasteful' collections. I have been to many a fabric shop and had to wade through loads that wasnt to my taste, but this place was full of quality fabrics including some gorgeous retro styles that clearly appealed to me! They also had loads of Merchant & Mills stuff, and I am such a sucker for their beautiful packaging and branding.
The shop itself operates among a cute little collection of single storey small business units, at Layby Farm in Stoke Mandeville. I didnt have time to check out the other places but noticed they include an art gallery and biscuit shop, and the units are a stones throw from a goat petting zoo which is brilliantly random!


Check them out online here, or in person Mon - Sat, 10 -2
Fabric HQ, Unit 8, Layby Farm, Old Risborough Road,
Stoke Mandeville, Buckinghamshire, HP22 5XJ
Friday, 8 July 2016
Arty party bags
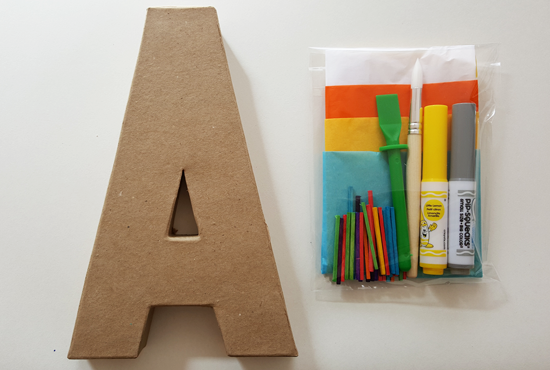
My little girl turned 3 a little while ago and we held a little party for her. I put together these 'party bag' gifts for her friends so they could get arty at home after the party. I bought some 3D card letters in the initials of the party guests, and added some bits and bobs for them to get decorating. I added a glue spreader, paintbrush, tissue paper and coloured matches, but you could add all sorts of crafty bits to mix it up a little.
My daughter and I had fun making hers before the party, and she was excited to hand them out to her friends. Maybe next year we will attempt a full on arty birthday party, when I have the time to do a little more planning... this is a nice little idea for an alternative party bag anyhow, just add PVA and little fingers and imagination!


My daughter and I had fun making hers before the party, and she was excited to hand them out to her friends. Maybe next year we will attempt a full on arty birthday party, when I have the time to do a little more planning... this is a nice little idea for an alternative party bag anyhow, just add PVA and little fingers and imagination!



Friday, 27 May 2016
Wedding table plan map - Mel & Adam

A few months back I was asked to help design a table plan for some friends' wedding. Fellow animators Adam and Mel suitably chose the theme 'books from our childhood' and wanted to have each table as a character or book that meant something to each of them when they were growing up. Mel had suggested the table plan be a map showing each of the fictional places, so I got about doodling and designing it for them.
I created a map based upon one of the themes, the 100 Acre Wood from Winnie the Pooh, and added in mountains, paths and trees to make different areas such as Moomin Valley, Roald Dahl's BFG, Alice's Wonderland to name a few. It was quite a challenge to marry up each of the different illustrative styles from each book, and to also find suitable space for the guests names, without making the whole thing too busy and messy.
I had the idea that it would be really fun if the map was actually printed and folded like an actual map, rather than one big table plan on the wall. The guests could each take a map and go to find their seat in the reception. Mel loved this idea so we ran with it and she had someone make a custom box to hold and display them. This was a playful twist on the usual table plan, which really suited this playful and fun-loving couple. (They walked down the aisle to the Star Wars theme played on the church organ by the way!) The table plans were printed onto a cream 200gsm card and map-folded.
Another really personal and unique wedding design for a special couple, I had loads of fun doing this!


Monday, 23 May 2016
Rhi & Dom's rural wedding 'Part 2'

Some of you may remember the wedding stationery which I designed last year for country couple Rhi and Dom (catch the original post here). The big day finally came and went this month, and I completed more design and print work for them in the shape of orders of service, confetti pouches, table and place names, menus...
Attention to detail and adding the personal touch were key to this project, and it was lovely to be able to be create so many coordinating pieces of design and print for this client. I handstitched the order of service booklets with a thin jute twine, and I made some custom card sleeves for the boxes which the couple presented their starters in for each guest. A really cute idea. I also adapted the original tree illustration to work as a fingerprint tree 'guestbook' at the bride's request. Its always really nice to receive photos back from the client of all the final print in action on the day, looks like a stunning wedding! Love the tree theme and the hanging plant pots and lights, beautiful.


Friday, 29 April 2016
Pressing the unpause button!

A little announcement that our new arrival entered the world a little while back, and along with his nutty sister has been keeping me very busy of late! I have also been working on some wedding stationery jobs, and some new ideas (with all the free time I have, ahem)
So, apologies for the 3 month silence, and I shall be back really soon with more projects and hopefully get the posts up regularly again. Thanks for sticking with me and in the meantime here's a picture of my new son trying out the baby shoes I made a few posts back. If you missed here, here's a link to the 'how to'

Monday, 11 January 2016
Wrapper collage cards
 Happy New Year!
My little girl received lots of lovely gifts from friends and family at Christmas so on Boxing Day we set about hand making some thankyou cards from her. Having indulged in a heap of choccie feasting, we were left with loads of cellophane coloured wrappers (yes, I am that person that puts the wrappers back in the tub!) Quality Street wrappers especially are great for making colour collages, they are good bold colours and quite tough.
I cut out various shapes of different sizes and got the glue stick ready. This was a really fun activity for my 2yr old, and also a great opportunity to talk about shapes and colours, and a brilliant early exercise in composition! As the colours overlap to make new colours she also learnt about colour mixing, bonus! She took 1 of each shape for each card, so each card was made up of the same elements but each one turned out completely different. I was amazed she had the patience to sit and do a set of 20 cards!
Happily we got these in the post before the new year, which was all part of the fun for her. How nice to make these individual cards, a cheap activity to do with your kids at any time of year. We may even get going on a large composition for her bedroom wall. Have a go!


Wednesday, 9 December 2015
Christmas Cards on sale now!

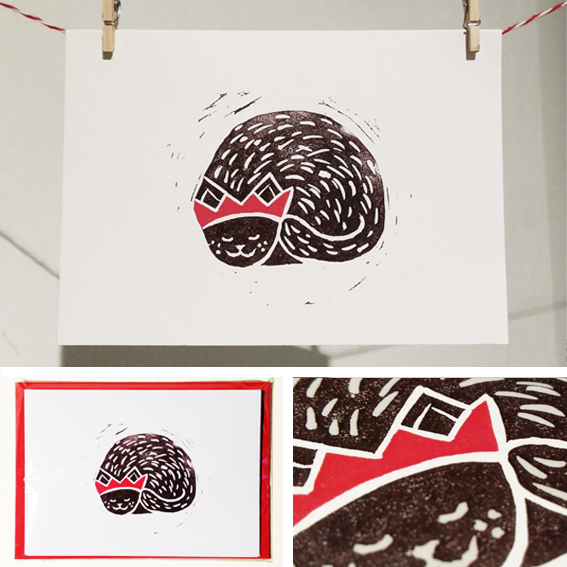
Well its that time of year again and the tree is up! I was hoping to post some Christmas craft ideas by now, but have been just so busy with some freelance design work and preparing for our new arrival. I do however have some festive news - back by popular demand are my 'festive pets' Christmas cards. They come in 2 designs in packs of 5, for £6 a pack (+ postage). The designs are from an original linocut of mine, and are digitally reproduced here onto high quality Conqueror High White 300gsm card, complete with poppy red envelope. Send these to your special animal loving friends!
Find them at my shop here: http://makeplaydo.bigcartel.com/
I am also selling some original lino prints of the designs, for £10 a print (+ postage)
Go see!

Wednesday, 18 November 2015
Wedding stationery - Rhiannon & Dom
Apologies for the long break between posts, juggling a toddler full time with freelance projects and the blog whilst heavily pregnant is making life interesting!


Here's a recent wedding invitation I did for happy couple Rhiannon and Dom. Whilst developing the brief it became clear they were both mad about their dogs, and also their landrover! They really wanted the dogs (and the landrover) to appear on the invitations, and the whole thing to reflect their country lifestyle complete with rustic, natural vibes. Having experimented with several pastel palettes, they decided in the end to go with a classic black and white, with some tactile brown twine and natural recycled envelopes. We printed onto Conqueror Oyster Hammered stock, to add texture and tie in with the whole theme.
Designing a bespoke motif that was so personal to Rhi and Dom was lots of fun, tweaking the shapes of the dogs ears and poses to make sure they looked their beloved pets! Other little images of wellies, flowers and leaves completed the look. I believe the dogs are going to be present at this beautiful country wedding next Spring, complete with flower garlands. Perfect!


Wednesday, 23 September 2015
Make your own - baby shoes
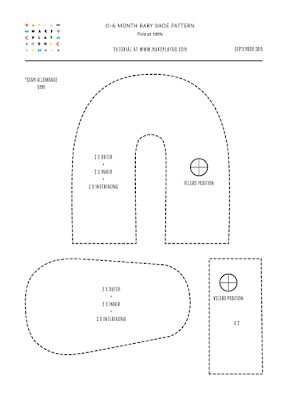
Download your FREE pattern here

I must admit, being the first time I have ever tried this I found some parts pretty fiddly. I have not been discouraged though, and have so much lovely fabric sat about that I shall be trying these again and perfecting the technique, and tweaking the pattern. You don't need much material for these shoes as they are so teeny tiny, I used about a quarter of a fat quarter of each fabric.
What you need:
2 contrasting cotton fabrics of your choice
Medium weight iron-on interfacing
A very small amount of velcro strip!
Buttons of your choice
1) Cut out the paper pattern, and transfer this to your fabrics for cutting. You need to end up with 2 of each shoe piece in each fabric, plus 2 strap rectangles in the outer fabric. See pic.

*Make sure the gummy spots on the interfacing are face down to your fabric and not the iron!
3) Make the straps by folding the rectangle pieces lengthways, right side together, and stitch up the open sides with a 5mm seam allowance. I decided to make mine curved, you can freestyle this if you fancy it, or stick to straight edges if that's easier.
These then need to be turned right side out, which I found really tricky due to their small size! I used a pencil end and my nails, and a good handful of patience!


You then need to position the straps, velcro side up, in line with the velcro on the U-shape. See pic. Once happy with the position, stitch these in place.


6) You now need to attach the inner U-shape piece to what will be the inside sole. I found this to be the trickiest part, so (after a few attempts and a lot of unpicking) I found it best to hand stitch them together before going to the sewing machine. You really have to bend the fabric as you are joining them, to get a nice curve shape. I plan to practice this!
7) Once you have both outer shoe piece and inner shoe piece prepared, place the inner inside the outer and stitch around the top where the foot will go in, leaving a 30mm gap for turning right way out.
Trim all around with pinking shears so you get a clean edge when you turn out. Once turned the right way out, retuck the inner shoe piece back into the shoe to give the final shape.


And that's it! This is a very easy pattern, but not such an easy make! I think with a bit of practice, and a larger shoe size, this could be perfected. I need more making time in my week!
The finished shoe size is 0-6 months, perfect to keep those tiny toes warm and looking cute!

Subscribe to:
Posts (Atom)