Friday, 29 April 2016

Pressing the unpause button!


A little announcement that our  new arrival entered the world a little while back, and along with his nutty sister has been keeping me very busy of late! I have also been working on some wedding stationery jobs, and some new ideas (with all the free time I have, ahem)

So, apologies for the 3 month silence, and I shall be back really soon with more projects and hopefully get the posts up regularly again. Thanks for sticking with me and in the meantime here's a picture of my new son trying out the baby shoes I made a few posts back. If you missed here, here's a link to the 'how to'


Monday, 11 January 2016

Wrapper collage cards

Happy New Year!

My little girl received lots of lovely gifts from friends and family at Christmas so on Boxing Day we set about hand making some thankyou cards from her. Having indulged in a heap of choccie feasting, we were left with loads of cellophane coloured wrappers (yes, I am that person that puts the wrappers back in the tub!) Quality Street wrappers especially are great for making colour collages, they are good bold colours and quite tough.

I cut out various shapes of different sizes and got the glue stick ready. This was a really fun activity for my 2yr old, and also a great opportunity to talk about shapes and colours, and a brilliant early exercise in composition! As the colours overlap to make new colours she also learnt about colour mixing, bonus! She took 1 of each shape for each card, so each card was made up of the same elements but each one turned out completely different. I was amazed she had the patience to sit and do a set of 20 cards!

Happily we got these in the post before the new year, which was all part of the fun for her. How nice to make these individual cards, a cheap activity to do with your kids at any time of year. We may even get going on a large composition for her bedroom wall. Have a go!


Wednesday, 9 December 2015

Christmas Cards on sale now!


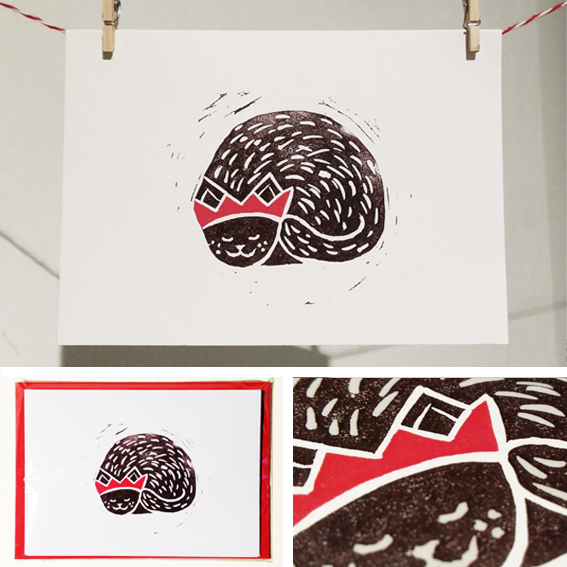
Well its that time of year again and the tree is up! I was hoping to post some Christmas craft ideas by now, but have been just so busy with some freelance design work and preparing for our new arrival. I do however have some festive news - back by popular demand are my 'festive pets' Christmas cards. They come in 2 designs in packs of 5, for £6 a pack (+ postage). The designs are from an original linocut of mine, and are digitally reproduced here onto high quality Conqueror High White 300gsm card, complete with poppy red envelope. Send these to your special animal loving friends!

Find them at my shop here: http://makeplaydo.bigcartel.com/

I am also selling some original lino prints of the designs, for £10 a print (+ postage)

Go see!


Wednesday, 18 November 2015

Wedding stationery - Rhiannon & Dom

Apologies for the long break between posts, juggling a toddler full time with freelance projects and the blog whilst heavily pregnant is making life interesting!

Here's a recent wedding invitation I did for happy couple Rhiannon and Dom. Whilst developing the brief it became clear they were both mad about their dogs, and also their landrover! They really wanted the dogs (and the landrover) to appear on the invitations, and the whole thing to reflect their country lifestyle complete with rustic, natural vibes. Having experimented with several pastel palettes, they decided in the end to go with a classic black and white, with some tactile brown twine and natural recycled envelopes. We printed onto Conqueror Oyster Hammered stock, to add texture and tie in with the whole theme.

Designing a bespoke motif that was so personal to Rhi and Dom was lots of fun, tweaking the shapes of the dogs ears and poses to make sure they looked their beloved pets! Other little images of wellies, flowers and leaves completed the look. I believe the dogs are going to be present at this beautiful country wedding next Spring, complete with flower garlands. Perfect!


Wednesday, 23 September 2015

Make your own - baby shoes

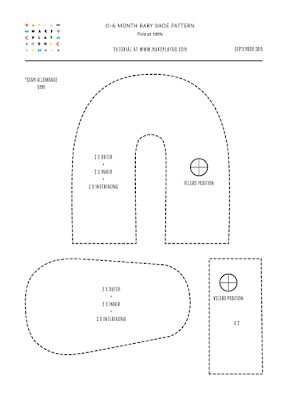
Now seems like a good time to announce that we have a new baby on the way! With that in mind I have turned my hand to making some cute baby shoes this week. This is also the first of many posts to include a free printable pattern to download, to accompany the tutorial. Hope you like it!

Download your FREE pattern here


I must admit, being the first time I have ever tried this I found some parts pretty fiddly. I have not been discouraged though, and have so much lovely fabric sat about that I shall be trying these again and perfecting the technique, and tweaking the pattern. You don't need much material for these shoes as they are so teeny tiny, I used about a quarter of a fat quarter of each fabric.

.


What you need:

2 contrasting cotton fabrics of your choice
Medium weight iron-on interfacing
A very small amount of velcro strip!
Buttons of your choice


1) Cut out the paper pattern, and transfer this to your fabrics for cutting. You need to end up with 2 of each shoe piece in each fabric, plus 2 strap rectangles in the outer fabric. See pic.

2) Iron on the interfacing to the reverse of the outer U-shapes, and the reverse of the outer sole pieces. (Follow the packet instructions for temperature and timings)
*Make sure the gummy spots on the interfacing are face down to your fabric and not the iron!

3) Make the straps by folding the rectangle pieces lengthways, right side together, and stitch up the open sides with a 5mm seam allowance. I decided to make mine curved, you can freestyle this if you fancy it, or stick to straight edges if that's easier.

These then need to be turned right side out, which I found really tricky due to their small size! I used a pencil end and my nails, and a good handful of patience!


4) Cut small circles of velcro and stitch these to the straps, using 2 crossed lines to secure. Secure the opposite velcro pieces to each U-shape as shown on the pattern, on the right side of the fabric as shown above.


You then need to position the straps, velcro side up, in line with the velcro on the U-shape. See pic. Once happy with the position, stitch these in place.


5) Next fold the U-shape pieces in half, right sides together, and stitch with a 5mm seam along the straight edges.

6)  You now need to attach the inner U-shape piece to what will be the inside sole. I found this to be the trickiest part, so (after a few attempts and a lot of unpicking) I found it best to hand stitch them together before going to the sewing machine. You really have to bend the fabric as you are joining them, to get a nice curve shape. I plan to practice this!

7) Once you have both outer shoe piece and inner shoe piece prepared, place the inner inside the outer and stitch around the top where the foot will go in, leaving a 30mm gap for turning right way out.

Trim all around with pinking shears so you get a clean edge when you turn out. Once turned the right way out, retuck the inner shoe piece back into the shoe to give the final shape.


8)  Press the little shoe with an iron, to ensure a good clean shape, and then hand stitch the opening that you left from the outside.


And that's it! This is a very easy pattern, but not such an easy make! I think with a bit of practice, and a larger shoe size, this could be perfected. I need more making time in my week!

The finished shoe size is 0-6 months, perfect to keep those tiny toes warm and looking cute!


Sunday, 6 September 2015

Make your own - kids duvet cover


 This week I was at the sewing machine again trying my hand at making a reversible duvet cover for my daughter. I found this lovely fox print cotton fabric on ebay some time ago, and have been searching for the perfect pattern to compliment it for the reverse side. Last week I found it - a perfect matching orange fabric with tiny pin dots. I knew she would love it!

This was a really fulfilling project to do, and I get to see the happy customer go to sleep all snuggled up in it every night. I think that's worth the 6 hours of cutting, measuring, pinning, pressing and stitching! Granted you can go and buy a kids duvet cover cheap as chips, but putting the time and effort into making a bespoke handmade cover for your little one is really rewarding, and she loved watching the process through to the final result, and I got big 'thank you' cuddles!

Below is a brief tutorial on how to do it:

*Before starting I made sure to prewash & iron both fabrics

1) Measure & cut your fabric.
My duvet measures 120cm x 150cm, so I added 1.5cm seam allowance to the top and sides, and 5cm to the bottom. You can play with these measurements how you like, but don't forget to add more at the bottom than the top and the sides.

2) Prepare the bottom of the cover
First prepare the bottom of the duvet cover, where the opening will be. I folded and pinned the bottom up 8mm, pressed the seam edge and zigzag stitched along the length (starting and finishing 1.5cm in from the fabric edge where the side seams will be.)
Fold over again at 2cm and repeat the process with a straight stitch, so your left with a neat pressed and stitched bottom to the fabric. This will become the opening area, where the poppers will attach.

Repeat on the second piece of fabric


3) Pin & stitch pieces together
Placing your 2 fabrics RIGHT sides facing, pin all around carefully.
Straight stitch all around, leaving an opening across the bottom that starts and finished from approx. 15cm in.

As the cover will be washed regularly I then restitched the same with a zigzag, to prevent frayed edges and secure it.

Trim away the corners carefully, so that there's no puckering when you turn the right way round. Careful not to cut too close to the stitch.

4) Turn the right way out
Once turned the right way out you should have a nice neat cover with smooth corners, and an opening at the bottom. Press the opening inner seams flat to give a clean line and prepare for the fastenings.

5) Measure and mark for the poppers
I measured the first popper dead centre of the opening, and then a further 2 placed equidistantly. I marked these points with a pencil.

6) Add your poppers!
I used these great little snap fasteners, with this little tool that cost £1 on ebay. You put the male and female parts through the fabric as required, and hammer into place. Bosh!


That's it - sounds really easy, and it was - but it took a lot longer than I imagined. Worth it to do a neat job though and this duvet will surely get some use. Enjoy having a go - let me know how you get on!


Wednesday, 2 September 2015

Wedding Stationery - Amy & Michael

Here's a snapshot of some recent wedding stationery I designed for the lovely Amy & Mike. I put together an invitation pack for them, bound in a copper and black wrap around. Opening up you find the main invitation, additional information (complete with illustrated map), and RSVP cards, tied together with some copper thread. At the bride-to-be's request one of the RSVP cards is a cassette tape, for guests to name their tune for the evening playlist. What a great retro touch!

This was a really fun project to work on, drawing pine cones, acorns and wheatgrass and finding just the right typefaces for the job. I also really liked drawing a map and adding some personal touches specific to the happy couple. Including a metallic element was a nice challenge, and Amy was very excited to receive her proof in the post - saying it was like opening a Wonka bar and finding the golden wrapper! I even got some lovely round cornering into this project, gotta love a round corner!